Thursday, December 3, 2009

Biscuit Tin


http://mundominitutoriales.blogspot.com/

Friday, November 20, 2009

Wanna be a "published" artisan?

Do you have a creation you're especially proud of?

http://craftgawker.com/
This is a site where you can see what other people make but also submit your own items.

Food Labels

did I show you this link?

http://www.thelabelman.com/index.php?cPath=54&osCsid=df7f9bb96eae2afd0103dbd31390e29f


All you need to do is resize.

Saturday, November 14, 2009

Danish printies & tutorials

Printies:
http://www.mini1til12.dk/print.htm
http://www.mini1til12.dk/links6.htm

Tutorials:
http://www.mini1til12.dk/ideer.htm

Thursday, November 12, 2009

Multi Tutorials

http://anajah.favorietje.nl/

tips & tricks at: http://servidorti.uib.es/miniaturas/mistalleres.htm

(I may have shown this one before) http://casita-mini-1.jouwpagina.nl/


.....enjoy

Sunday, October 18, 2009

Making 3 Baby Baskets

Material for the bucket or basket:
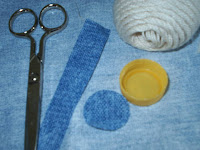
A scrap of cloth, a bottle cap size you want or medication caps, wool, glue, scissors, glue, a clamp.
Preparation:
Cut a circle of fabric the size of the cap and a slightly larger rectangle measuring double the length and width of the cap sides.

Glue the fabric rectangle so that half is inside the cap and the other half on the outside; then paste the fabric circle to the inside bottom of the cap.
Using your wool glue it to the outside of the cap. Begin to cover the fabric starting at the top & working it tightly towards the bottom ... once you get to the base, turn to the cap over and using the glue and tweezers fill the base in. You might like to add a thin glue overcoat to the wool to ensure it doesn't unravel.
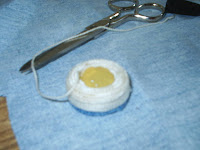
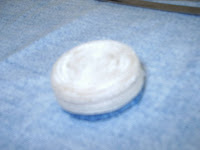
And let dry. You can color, varnish or leave it.

You can decorate with colored ribbons etc. Or just fill and wrap.

OR:
take the same fabric covered cap
wrap the outside with a wide pleated ribbon
make a handle from thinner ribbons


this tutorial is thanks to "Casa de Bonecas


AND


MATERIALS:


Plastic ICE CUBE container* Lace * Ribbon * Fabric for towels-diapers-washcloths, etc.* Small plastic tubing, pieces of wood dowel or soft wood for baby bottle and baby powder container * Beads for other bottles* Printed labels

TOOLS:

* Hobby cutting mat
* Craft knife * Scissors * Acrylic paints in desired colors * Paintbrushes
* Hobby glue * Clear nail polish * FIMO oven-bake clay

DIRECTIONS:

1. Cut out "square" from the ice cube container. Trim with craft knife/scissors to desired height.

2. Paint container desired color. Samples use the standard baby colors, pink for a girl and blue for a boy. Let dry.

3. Glue piece of lace around top edge of basket. Form a ribbon bow and glue centered to front of basket.


TO FILL BASKET:

1. Fold and glue small pieces of fabric into basket for diapers, towels, clothing, washcloths, etc.

2. Make small bars of soap from pieces of FIMO. Bottles can be made by glueing various beads together.

3. A small piece of plastic tube or piece of dowel can be used to form baby bottle. Print, cut out and glue desired labels to bottle.

4. Cut out baby albums, birth cards or desired items. Varnish with clear nail polish for a glossy finish.

5. Arrange items in basket as desired and glue in place.
Miniature Project by Kitty Balke

Dress


dress pattern

The dress model was made in taffeta. The silk is much thinner; small changes to the pattern may be made to look better ...

Cut:
Cut the pieces of the pattern: 1 copy of the back, and all others in duplicate. We can make a surjupe (over-dress): cut it as a skirt, then roll up the end of work.

Blouse:
Build by the shoulders and the back half lead.
We will now make a slit to give volume to the bodice. It will ensure that the back and half-lead overlap properly, without the notch front is too important: it must meet the half overlap slightly at the bottom. Here's how:

-Except for the silk to make a cut on the half-lead, along the dotted line indicated by small scissors on the head. Bring the pan while the central tissue on the pan side, so that the cutting line come to overlap with the other dotted line on the boss.

-For the silk to make a notch in the center of the triangle pattern, then sew along the dotted triangle.

Sleeves:
Skip wire knits in upper hose between dashes to the top and along the bottom.
Assemble the top of the sleeves sleeves.
Assemble the top of the sleeve blouse.
Close the bodice with a side seam.

Make a small stitch to keep the two half-set lead in their bottom to facilitate assembly on the skirt.

Skirt:
Assemble the front and back of the skirt at the sides.
If there is a surjupe, prepare the same way, and carefully superimposed onto the first skirt.
Skip wire knit at the top of the skirt (in the two skirts together if one surjupe)
Attach the skirt to the bodice.

Finishes :
Add a little lace to the bodice. Use just a small rectangle of fabric.
Facing the possible surjupe, doing embroidery ...
Setting the movement of the dress not with fabric hardener that would spots on both the synthetic as silk, but with the hairspray.

More Printies

vintage advertising posters

cards, dart board, games

current grocery packaging

vintage grocery packaging

milk, juice, & soda cans

The printies liked above all came from a french site. If you want to see what else they have click here

Converting from 1:1 to 1:12

metric conversion table

high def conversion ruler ....sorry metric only!

directly printable conversion ruler .....sorry metric only!

print them off & laminate.

Printies of a Different Kind

These three printie links are great for making books or classical hanging etchings:

fine art prints

panteek.com

vintageprintagles

Tuesday, October 13, 2009

Halloween Fun

I'm going to post this on both sites because when I first saw it, my first thought was how brilliant and how easy!
My thanks to Nancy Cronin for her permission to post it. Here in her own words is the tutorial:
I was playing around with one of those easily available skellie and unfinished boxs that you can find at Micheals.


1. cut the skellie at all of the joints
2. drill a hole in the joints
3. glue a wire in the joints. Now you can reposition him any way you want.


4. I fleshed him out a bit so that his clothes hung better
5. the box is covered in faux cement blocks. I tore apart an egg carton , glued them to the box, and dabbed paint here and there. He has a mask in his hand but its hard to see in the picture.

Here's another skellie rising from his grave. Guess it's hard to keep a good man down!


If you'd like to see some of the other things that Nancy's done, here's the link:
http://www.picturetrail.com/nancyc1938

Monday, October 12, 2009

Europen Links to Check Out

lots of links on this page, wait until you have some time & a coffee or tea by your side; enjoy:

http://maipoup.blog4ever.com/blog/lire-article-132227-464722-des_liens.html

Remember to have a translator with you.

Making Pumpkins

Supplies:

Orange Fimo or Sculpy oven-hardening clay
Green Fimo or Sculpy for leaf and vine
Brown Fimo or Sculpy for stem
Brown Stain
Toothpick
Aluminum Foil
1 Tissue

Roll a tissue into a ball. Cover it with a 6" x 6" or so piece of aluminum foil, and roll this between your palms to form a rough ball.

Break off about 1/5th of the orange clay from the package, and roll into a ball. Then, flatten it with your fingers.

Place this flattened clay around the tinfoil ball. Smooth this with your fingers as you go. Make it into your pumpkin shape.

If you encounter foil popping through the clay, you can add and smooth another piece of clay over it.

Take the toothpick and make the 'lines' of the pumpkin. You can also use the toothpick to make other marks on the pumpkin.

To make the leaf, form a small ball, flatten it, and use your toothpick to cut 'leaf' shapes in the edges. You can then add the leaf 'lines' or 'veins'. Put it at the top of your pumpkin.

Roll a very small piece of brown for the stem. Use your toothpick to shape it into a stem.

Once the stem and leaf are in place, you will want to add a vine. Roll a small piece of the green you used for the leaf into a 'string'. You can vary the thickness of this, according to how thin or thick you need your vine to be. Pumpkin vines are 'curly', so just twirl it on the pumpkin as you like.

THIS IS THE TIME TO BAKE THE PUMPKIN ACCORDING TO THE DIRECTION ON YOUR CLAY PACKAGE. MAKE SURE TO FOLLOW THESE DIRECTIONS EXACTLY. MAKE SURE TO BAKE IN A WELL-VENTILATED AREA.

Check out Julie Old Crows' other tutorials: http://yummyminiaturefoods.blogspot.com/

Tiered Server


I take some woodies,gleu(for wood),tacky and my dremel, and see the photo's

At the end I take some nail polish and put it on the lage so it's almost stone-hard.

http://gondasminiaturen.blogspot.com/2009/10/cakeplateau.html

Christmas Wreath


Required materials:

◦ornaments FL430, DV730 and FL286
◦30 cm red silk ribbon 2mm wide
◦thin green wire or florist wire
◦holly leaves and holly berries
◦tacky glue, scissors, side cutting pliers, file

Tie the little bell DV730 to the middle of a piece of
red silk ribbon about 20 cm long.

Thread the two ends of the ribbon to each side through
the holes of the inner circle of ornament FL430.
Make sure the bell keeps hanging loose.
To make the threading easier put some tacky glue on
the outer ends of the ribbon and give it a twist.
When you have reached the middle below the bell put
the ribbons backwards through a hole of Fl 430

Cut a buckle of ornament FL286 with the cutting pliers.
File the edge smooth with the file if necessary.

Put the buckle on the two ribbons and put some tacky glue
on the back of the buckle to make it stick. Cut the ribbons
slantwise to the desired length. Make a little loop with
a piece of red ribbon and attach it to the top of FL430.

Attach little pieces of green wire to FL430 by putting the wire through the holes of FL430 and bending it resembling little twigs.
Glue holly leaves and holly berries to the wire.

How to make your own Tiles

http://taeniasminiatures.blogspot.com/2009/10/how-to-make-your-own-tiles.html
I varnished some board black and subsequently added two or three layers of uncoloured high gloss paint.

Afterwards I cut "tiles" with the size of 2 cm x 1cm and fixed them with tacky glue to uncoated paper.

I added some trim made of corrugated board.


And this is the first finished wall...

I will grout the tiles after adding some more layers of uncoloured high gloss paint with emulsion paint.

Angel Pyramid


Required materials (from left to right):
DV 752, FL 274, KR 639 (4x), OV 900-R (4x),
SR 681 (3x), KR 666 (2x), FL 282, KR 690, KR 691 (2x),
OR 012 or OR 013 (4x), DV 771 (4x), FL 338, KR 652
Combination pliers, tweezers, cutting pliers, jewel cement, superglue, small hammer, firm pair of scissors

You can order a full set of ornaments to make this Christmas pyramid stating the order number W9 for the price of € 4,70. This set includes 1 reserve DV 771 and 1 reserve KR 652 since these items tend to get lost. http://www.bindelsornaments.nl

Bend 4 points of FL 274 upwards to a horizontal position with the combination pliers.
Skip 2 points between the points to be bend.

Glue the candleholders (KR 639) on the knick of the bended points with jewel cement.

Cut off the pin (DV 752) to a length of approximately 5 cm and make it straight as much as possible.
Glue the pin with superglue in the center hole of FL 274.
Let it dry thoroughly.

Put the following ornaments on the pin:
SR 681, KR 666, SR 681, KR666.

Do not apply any glue between these parts.

Put KR 691 through the center hole of FL 282.
Place the little tube KR 690 on top of KR 691 and give it a gentle smash with the hammer in order to let the tube fit over KR 691.

Attach the 4 angels (OR 012 or OR 013) to FL 282 using the open rings (DV 771) and the combination pliers.
Skip 2 holes between the angels.

Put FL 282 on the pin; the little tube will partly fall over the upper KR 666. Then put the third SR 681 on the pin.

Do not apply any glue between these parts.

Make the propeller of the Christmas pyramid by cutting FL 338 up to the edge of the center hole.
Bend the blades of the propeller into the right position using the combination pliers.


Put the second KR 691 on the pin with the tube part of KR 691 upwards. Then put FL 338 on the pin with the tube of KR 691 through the center hole of FL 338.

Still no glue.

Cut off the pin so it sticks out 2 mm.
Put some jewel cement on the top of the pin and glue the little bead (KR 652) on the pin.

Cut off the candles to a length of 1 cm and glue them in the candle holders.
Let it dry thoroughly.

If you blow gently against the propeller the little angels will turn and fly!